
Mastering Bambu Studio: Essential 3D Printing Parameters
- shiva ganesh
- Aug 12
- 7 min read

A comprehensive, practitioner-friendly guide to dialing in slice settings for optimal quality and performance.
Introduction to 3D Printing Parameters

If you've ever used a 3D printer, you’ve probably come across settings like layer height, infill, or print speed. These are called 3D printing parameters – and they control how your print turns out.
Think of your printer like a digital hot glue gun that builds objects layer by layer. The slicer software (like Bambu Studios, Cura or PrusaSlicer) translates your 3D model into instructions for the printer. The slicer parameters define how each layer is laid down – affecting the quality, strength, time, and material usage of your print.
Understanding these settings, even at a basic level, helps avoid failed prints, improves quality, and lets you customize results for different needs.
Table of Contents
1. Layer Height & Resolution
Definition:
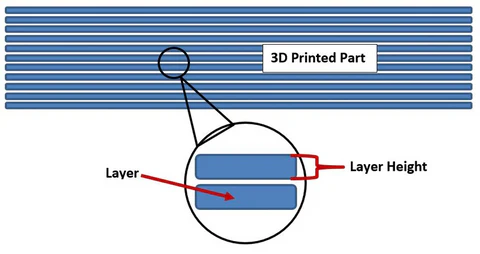
Layer height is the vertical thickness of each deposited layer in your print. This setting governs how visible the layer lines will be and dictates the smoothness of curved surfaces. Smaller layer heights yield finer detail but increase print time and sensitivity to nozzle/filament issues. Larger layers speed up the job but make the print look coarser.
Example:
Printing a tabletop miniature at 0.12 mm for smooth details versus a quick workshop jig at 0.28 mm for faster results.
Types:

Fine (0.05–0.12 mm), Standard (0.15–0.20 mm), Draft (0.25–0.30 mm)
Most Commonly Used:
0.20 mm — strikes a balance for most functional models.
Applications:
Miniatures and display pieces → 0.1 mm
Mechanical components → 0.2 mm
Large prototypes or rough drafts → 0.3 mm
Best Setting for Quality:
0.15–0.20 mm for general use; drop to 0.10 mm for high fidelity.
2. Wall / Shell Thickness
Definition:
Wall thickness refers to the number of outer print perimeters—or "shells"—and defines surface durability, waterproofing, and resistance to mechanical stress.
Example:
A decorative vase may only require 0.8 mm walls, but a functional bracket benefits from 1.6 mm walls for added durability.

Types:
Thin (1–2 shells)
Standard (3 shells)
Heavy-duty (4+ shells)
Most Common:
3 shells (~1.2 mm with a 0.4 mm nozzle)
Applications:
A vase: 2 shells
Gears or load-bearing parts: 3–4 shells
Water-tight objects: 4+ shells
Best Setting for Quality:
3 shells (1.2 mm) for strength without wasting filament.
3. Infill Density & Pattern
Definition:
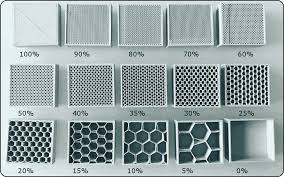
Infill is the internal structure that supports your print. Density determines how solid it is, while the pattern dictates strength distribution.
Example:
A drone arm with gyroid 25% for stiffness vs a cosplay prop with zigzag 10% for light weight and speed.
Types & Most Common:

Grid / Rectilinear (20–25%) — Default and balanced
Gyroid (20–30%) — Isotropic strength
Honeycomb (20–30%) — Strong + lightweight
Lines / Zigzag (10–15%) — Fastest but weakest
Concentric (10–15%) — Flexible designs
Application:
Functional structural parts → Gyroid 25%
Light decorations → Lines 10%
Tough, load-bearing parts → Honeycomb 30%
Best Setting:
Gyroid at ~25% offers great strength-to-weight performance.
4. Temperature Settings(Nozzle & Bed)
Definition:
Nozzle temp melts the filament; bed temp ensures first-layer adhesion. Both impact layer bonding and warping.
Example:

For PETG, setting the nozzle to 245 °C and bed to 80 °C improves bonding between layers and reduces stringing.
Types:
Material-specific
PLA: 190–220 °C / 50–60 °C
PETG: 230–250 °C / 70–85 °C
ABS: 230–260 °C / 90–110 °C
Most Common:
Default mid-range (e.g., PLA at 205 °C)
Applications:
Clean PLA prints → 200 °C
Strong PETG parts → 245 °C
ABS enclosures → 100 °C bed
Best Setting:
Use manufacturer’s mid-range and tweak ±5 °C based on adhesion or stringing.
5. Print & Travel Speed

Definition:
Print speed controls extrusion movement, travel speed controls non-print moves. Both influence quality and print time.
Example:
Printing fine details at 40 mm/s vs infill bulk at 100 mm/s dramatically impacts speed and surface quality.
Types:
Low: 30–50 mm/s (high quality)
Standard: 50–80 mm/s (balanced)
High: 80–120 mm/s (drafts)
Most Common:

60 mm/s for general use
Applications:
Small details → 40 mm/s
Travel moves → up to 150 mm/s
Draft prints → 100 mm/s
Best Setting:
60 mm/s for outer walls, higher for infill/travel.
6. Retraction (Prevents Stringing)
Definition:
Retraction pulls filament back during travel to reduce stringing across gaps.
Example:

0.8 mm retraction on direct drive extruders produces clean prints with minimal stringing.
Types:
Direct Drive: 0.5–2 mm
Bowden: 4–6 mm
Most Common:
1 mm at 35 mm/s (direct drive)
Applications:
Multi-part prints → full clean separation
Open frames → reduce interior strings
Best Setting:
Start with ~1 mm and adjust based on stringing.
7. Cooling & Fan Settings
Definition:
Active cooling helps filament solidify quickly, improving overhangs and detail. Some materials need less cooling to prevent warping.
Example:

PLA prints with 100% cooling show sharper bridges versus sagging with no fan.
Types:
PLA: 80–100%
PETG: 30–60%
ABS: 0–20%
Most Common:
100% after the first few layers for PLA
Applications:
Open lattice → 100%
ABS box → minimal fan
Best Setting:
Max cooling for PLA, moderate for PETG, low for ABS.
8. Bed Adhesion Techniques

Definition:
Methods like skim, brim, or raft boost first-layer stability.
Example:
A tall thin print uses a brim to anchor corners; a warped-prone ABS print uses a raft as a stable base.
Types:

Skirt (priming, no adhesion)
Brim (extra base outline)
Raft (thick base layer)
Most Common:
Brim for small models; raft for ABS or warped prints
Applications:
PLA small part → brim
ABS large part → raft
Best Setting:
Use a brim for 2D parts; raid for challenging materials.
9. Supports & Overhangs

Definition:
Support structures uphold overhangs past 45°, preventing droop or collapse.
Example:
A bust’s chin and arms use tree supports for minimal scarring and easy removal.
Types:

Tree Supports — lightweight, easy removal
Grid Supports — sturdier but harder to remove
Most Common:
Tree supports for figurines; grid for functional parts
Applications:
Sci-fi bust → tree supports
Mechanical bracket → grid supports
Best Setting:
Tree supports with low density (~10%)
10. Support Painting (Manual)

Definition:
Paint zones where supports are needed, rather than auto-generating across all overhangs.
Example:
Painting only beneath extended arms on a figure preserves clean surfaces everywhere else.
Most Common:
Use selectively on delicate models
Applications:
Detailed characters → painted supports only on necessary areas
Best Setting:
Hand-paint minimal support areas for cleaner results.
11. Orientation

Definition:
Rotating a part on the print bed affects strength, finish, and support needs.
Example:
Printing a load-bearing beam flat increases its rigidity along stress direction.
Most Common:
Align long, thin objects horizontally
Applications:
Wrench → print flat
Curved aesthetic piece → print upright
Best Setting:
Orient for minimal supports and optimal stress distribution.
12. Scaling & Cutting Tools

Definition:
Scaling resizes the model
cutting splits large parts to fit the print volume or optimize orientation.
Example:
A helmet cut into 4 pieces fits and prints better on standard build plates.
Most Common:
Cut large models; uniform scale only

Applications:
Large cosplay props → sliced into sections
Too-small prints scaled up for fit
Best Setting:
Slice > scale up when needed for print size.
13. Acceleration & Jerk
Definition:
Controls how quickly the print head changes speed/direction — high values may cause ghosting.
Example:

Using lower acceleration on a gear print yields cleaner teeth edges.
Most Common:
Defaults are good, but dial down for precision parts
Applications:
Quality prints → low acceleration
Single-use fixture → higher acceleration
Best Setting:
Use default unless detail improvement needed.
14. Flow Rate / Extrusion Multiplier

Definition:
Adjusts how much filament is extruded, correcting under/overflow.
Example:
If the outer wall measures 0.44 mm (vs. expected 0.4 mm), reduce flow by 90–95%.
Most Common:
95–100%
Applications:
Dimensional parts → calibrate flow precisely
Quick prints → default is fine
Best Setting:
Calibrate using a printed single-wall cube.
15. Clearance for Fit & Movement

Definition:
Design gap between moving or interlocking parts for correct post-print fit.
Example:
Snap-fit enclosure might require 0.2–0.3 mm gap in PLA for smooth assembly.
Most Common:
0.2–0.4 mm for moving parts
Applications:
Hinges → 0.3 mm clearance
Press-fit signs → 0.1 mm tight clearance
Best Setting:
Use 0.2–0.3 mm gap for PLA; add more for rigid materials.
16. Bambu Studio Advanced Quality Settings

Definition:
Includes features like “Smooth Speed Transition,” “Slow Down for Overhang,” “Avoid Crossing Wall,” etc., found in Process > Quality > Advanced.
Example:
Enabling “Slow Down for Overhang” reduces print speed at steep edges for better finishes.
Most Common:

Defaults enable smooth transitions and wall avoidance.
Applications:
Curved overhang prints → enable speed smoothing
Multi-zone parts → use advanced wall settings
Best Setting:
Leave defaults; adjust only if artifacts appear.
17. Final Tips
Tune one parameter at a time.
Use Bambu presets as a baseline, then customize.
Keep printer mechanics clean and leveled, and your filament dry.
Refer to Bambu’s forum for pattern-specific advice (e.g., gyroid reduces warping).
Calibrate regularly (print tests for flow, adhesion, overhang).
💡 Summary
3D printing can feel complicated at first, but understanding the basic slicer parameters puts you in control. From layer height to temperature, each setting influences how your model turns out. With time and experimentation, you’ll find the right balance between print quality, speed, and strength.


Comments